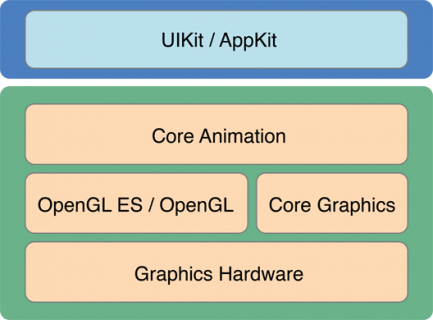
一.iOS-绘图基本框架

上图是iOS中图形图像的基本框架,UIKit是我们最容易也是最常接触到的框架,绝大多数图形界面都由UIKit完成。UIKit基于Core Graphics框架实现的。除了UIKit,还有CoreGraphics、Core Animation,Core Image,OpenGL ES等多种框架,来满足不同的绘图要求。
- UIKit:最常用的视图框架,封装度最高,都是OC对象。
- Core Graphics:主要绘图系统,常用于绘制自定义视图,纯C的API,使用Quartz2D做引擎。
- Core Animation:提供强大的2D和3D动画效果。
- Core Image:给图片提供各种滤镜处理,比如高斯模糊、锐化等。
- OpenGL-ES:主要用于游戏绘制,但它是一套图形图像编程协议规范,具体由厂商实现。
二.Core Graphics
Core Graphics 使用了Quartz作为绘图引擎。它提供了低级别、轻量级、高保真度的2D渲染。该框架可以用于基于路径的绘图、变换、颜色管理、脱屏渲染,模板、渐变、遮蔽、图像数据管理、图像的创建、遮罩以及PDF文档的创建、显示和分析。
Core Graphics 是一套基于C的绘图API框架。
基本概念:
- CGContext:表示一个图形环境。
- CGPath:使用向量图形来创建路径,并能够填充和stroke。
- CGImage:用来表示位图。
- CGLayer:用来表示一个能够用于重复绘制和offscreen绘制的绘制层。
- CGPattern:用来表示Pattern,用于重复绘制。
- CGShading/CGGradient:用于绘制剃度。
- CGColor/CGColorSpace:用来进行颜色和颜色空间管理。
- CGFont:用于绘制文本。
- CGPDFContentStream,CGPDFScanner,CGPDFPage,CGPDFObject,CGPDFStream, CGPDFString等用来进行pdf文件的创建、解析和显示。
使用Core Graphics来绘图首选需要获取一个CGContext(相当于画布),CGContext一般有三种获取方式:
- 使用UIView的Context,在
drawRect中使用UIGraphicsGetCurrentContext。 - 使用CALayer的Context,在
drawLayer中使用UIGraphicsPushContext(ctx)。 - 自己创建一个Context并设为当前Context(通常用于对图片的处理)。
使用UIView的Context绘制图形:
- (void)drawRect:(CGRect)rect
{
    // 获取上下文
    CGContextRef ctx = UIGraphicsGetCurrentContext();

    // 实心圆
    CGContextAddEllipseInRect(ctx, CGRectMake(10, 10, 50, 50));
    [[UIColor greenColor] set];
    CGContextFillPath(ctx);

    // 空心圆
    CGContextAddEllipseInRect(ctx, CGRectMake(70, 10, 50, 50));
    [[UIColor redColor] set];
    CGContextStrokePath(ctx);

    // -椭圆
    // 画椭圆和画圆方法一样,椭圆只是设置不同的长宽
    CGContextAddEllipseInRect(ctx, CGRectMake(130, 10, 100, 50));
    [[UIColor purpleColor] set];
    CGContextFillPath(ctx);

    // 直线
    CGContextMoveToPoint(ctx, 20, 80); // 起点
    CGContextAddLineToPoint(ctx, self.frame.size.width-10, 80); //终点
    [[UIColor redColor] set]; // 两种设置颜色的方式都可以
    CGContextSetLineWidth(ctx, 2.0f); // 线的宽度
    CGContextSetLineCap(ctx, kCGLineCapRound); // 起点和重点圆角
    CGContextSetLineJoin(ctx, kCGLineJoinRound); // 转角圆角
    CGContextStrokePath(ctx); // 渲染(直线只能绘制空心的,不能调用CGContextFillPath(ctx);)


    // 三角形
    CGContextMoveToPoint(ctx, 10, 150);
    CGContextAddLineToPoint(ctx, 60, 100);
    CGContextAddLineToPoint(ctx, 100, 150);
    [[UIColor purpleColor] set];
    CGContextClosePath(ctx);
    CGContextStrokePath(ctx);

    // 矩形
    CGContextAddRect(ctx, CGRectMake(20, 170, 100, 50));
    [[UIColor orangeColor] set];
    CGContextFillPath(ctx);

    // 圆弧
    CGContextAddArc(ctx, 200, 170, 50, M_PI, M_PI_4, 0);
    CGContextClosePath(ctx);
    CGContextFillPath(ctx);

    // 文字
    NSString *str = @"hello";
    NSMutableDictionary *dict = [NSMutableDictionary dictionary];
    dict[NSForegroundColorAttributeName] = [UIColor whiteColor]; // 文字颜色
    dict[NSFontAttributeName] = [UIFont systemFontOfSize:14]; // 字体
    [str drawInRect:CGRectMake(20, 250, 300, 30) withAttributes:dict];


    // 图片
    UIImage *img = [UIImage imageNamed:@"test"];
    [img drawInRect:CGRectMake(20, 280, 80, 80)]; // 拉伸
}
自己生成一个上下文环境绘制一张图片:
//该函数会自动创建一个context,并把它push到上下文栈顶,坐标系也经处理和UIKit的坐标系相同
UIGraphicsBeginImageContextWithOptions(rect.size, NO, 0);

CGContextRef context = UIGraphicsGetCurrentContext();
CGContextAddEllipseInRect(context, CGRectMake(0,0,100,100));

//填充颜色为蓝色
CGContextSetFillColorWithColor(context, [UIColor blueColor].CGColor);

//在context上绘制
CGContextFillPath(context);

//把当前context的内容输出成一个UIImage图片
UIImage* i = UIGraphicsGetImageFromCurrentImageContext();

//上下文栈pop出创建的context
UIGraphicsEndImageContext();

[i drawInRect:CGRectMake(0, 0, 100, 100)];
三.Core Image
Core Image是一种图像处理和分析技术,旨在为静止和视频图像提供接近实时的处理。
它使用GPU或CPU渲染路径对来自Core Graphics,Core Video和Image I / O框架的图像数据类型进行操作。核心图像通过提供易于使用的应用程序编程接口(API)来隐藏低级图形处理的细节。您不需要了解OpenGL,OpenGL ES或Metal的细节以充分利用GPU的强大功能,您也不需要了解有关Grand Central Dispatch(GCD)的任何信息,以获得多核处理的好处。
Core Image是Apple封装的一套Objective-C层级的图像处理API。
基本概念:
- CIContext:Core Image的处理上下文。
- CIImage:这个类持有图片的数据,可以用UIImage来创建,也可以使用图片文件或者像素数据来创建。
- CIFliter:这个类表示一个滤镜,它有许多属性,在内部由一个dictionary来维护。滤镜的种类有很多,比如是图片形变的滤镜,可以改变图片色彩的滤镜,可以裁剪图片的滤镜,等等。
- CIDetector:特征识别类,该类集成了苹果有关特征识别的一些功能。
Core Image框架中内置了很多强大的滤镜(Filter),这些滤镜提供各种各样的效果,并且还可以滤镜链的形式叠加在一起组合成各种效果。

//模糊设置处理
-(void)filterGaussianBlur
{
    //创建CIContext对象
    CIContext * context = [CIContext contextWithOptions:nil];
    //获取图片
    CIImage * image = [CIImage imageWithCGImage:[_image CGImage]];
    //创建CIFilter
    CIFilter * gaussianBlur = [CIFilter filterWithName:@"CIGaussianBlur"];
    //设置滤镜输入参数
    [gaussianBlur setValue:image forKey:@"inputImage"];
    //设置模糊参数
    [gaussianBlur setValue:[NSNumber numberWithFloat:_slider.value*10] forKey:@"inputRadius"];

    //得到处理后的图片
    CIImage* resultImage = [gaussianBlur valueForKey:@"outputImage"];

    //位移到中心点
    CGAffineTransform transform = CGAffineTransformMakeTranslation(center.x, center.y);
    CIImage *transImage  = [clockImage imageByApplyingTransform:transform];

    //链式合成
    CIImage *outputImage = [transImage imageByCompositingOverImage:resultImage];

    CGImageRef imageRef = [context createCGImage:outputImage fromRect:CGRectMake(0,0,self.image.size.width,self.image.size.height)];
    UIImage * image = [UIImage imageWithCGImage:imageRef];
    [_imageView setImage:imge];
    CFRelease(imageRef);
}